This guide walks you through the full Traveler Memory experience: from checking in and chatting with your AI character, to turning your trip photos into a story-filled album and a keepsake video. You’ll use it here: rental.touchmemory.ai.
1. Logging in
- Open the link on a tablet or phone.
- The login page opens on the “Guest” tab by default.
- In the “Check-in code” field, enter the check-in code your hotel or B&B gave you (e.g.
ABC234, not case-sensitive). - Tap “Log in”.
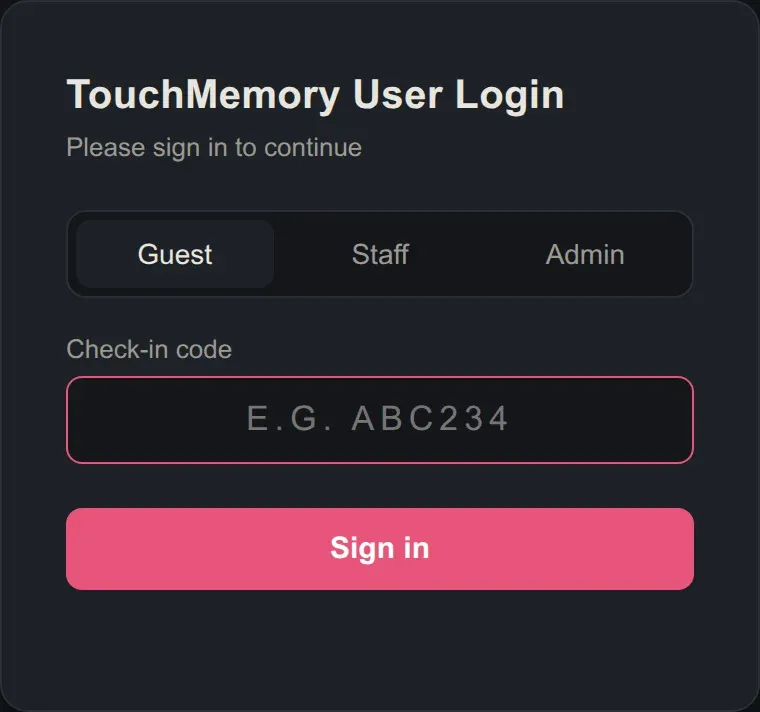
After 5 wrong attempts, login is temporarily locked (for 5 minutes) — just wait a moment and try again. Use the top-right corner to switch between Traditional Chinese / Simplified Chinese / Japanese / English.
One check-in code can only be tied to a single device. Once you log in on the first device, it’s locked to that one. If you switch to another phone or tablet, or clear your browser data and try to log in again, the second device will be blocked. To switch devices: first tap 👋 to log out on the original device, or ask the front desk for a fresh check-in code (any albums you’ve already made are unaffected).
1.1 Set what to call you (asked on first login)
The first time you reach the home screen, a small pop-up will ask “What should I call you?”, letting you tell the AI how to address you.
- Enter the name or title you’d like to be called (for example:
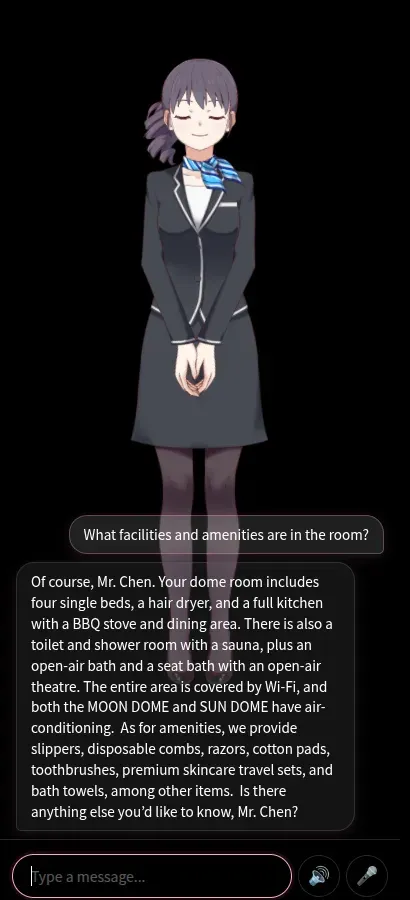
Mr. Chen,Anna), then tap “Done”. After that, the top-left corner and the AI’s chat will both use this name. - This name is only used so the AI can address you in conversation and welcome messages, and each guest sets their own.
- Want to change it later? Just tap the ✏️ next to your name in the top-left corner anytime.
This pop-up only appears once, on each guest’s first login.
2. Home screen at a glance
After logging in you land on the home screen, where the AI character appears (Haru by default, changeable in the back office) and greets you.
Top-left toolbar:

| Icon | Purpose |
|---|---|
| ⚙️ | Back-office settings (guest version, see section 7) |
| Now: your name ✏️ | Shows how the AI addresses you (e.g. “Now: Mr. Chen”); tap ✏️ anytime to set how you’d like the AI to call you (see section 1.1) |
| 📁 | My Files (videos, albums, background music, chat export, see section 10) |
| 👋 | Log out |
🖼️ Traveler Gallery isn’t in the top-left toolbar — it’s a separate button to the right of the artwork on the home screen (publish your album video, browse other people’s work, see section 9).
At the bottom:
- Text box — type directly to chat with the AI.
- 🎤 — tap once to speak, tap again to stop.
- 🔊 / 🔇 — turn the AI character’s voice replies on or off; when off, the AI only shows text and doesn’t speak.
Entering Animation Mode: every artwork / album photo has a ▶ Animation Mode button on its right side — tap to start; it also kicks in automatically after 5 minutes of inactivity. See section 4 for details.
3. Chatting with the AI
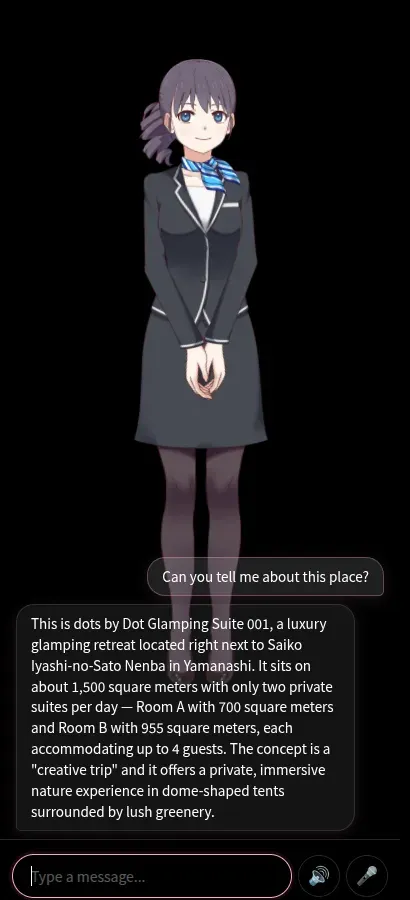
- Feel free to ask questions, chat, or ask it to tell you about the artwork in your room.
- It supports Chinese, Japanese, and English, and detects the language automatically.
- The character replies with voice plus expressions and gestures. (Don’t want to hear the voice? Tap the 🔊 next to the text box to turn it off, and the AI will reply in text only.)
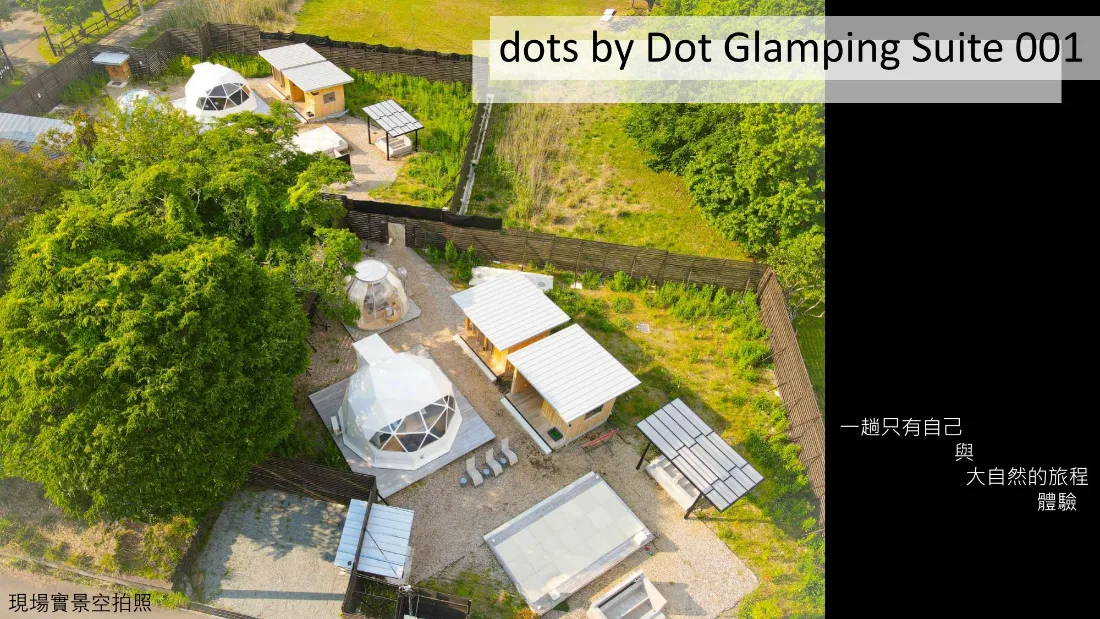
- Ask about this place and its facilities: for example “What’s the wifi password?”, “When is breakfast?”, “How do I use the hot spring?”, “What’s fun nearby?” — the AI character answers based on the accommodation intro album the property has prepared, like having a local helper on call anytime. (This album is built in advance by the property; if it hasn’t been set up yet, the AI answers with general knowledge.)
- Ask how to use this site: whenever you’re not sure how to do something, just ask in the chat box — for example “how do I upload photos to make an album”, “how do I download a video”, “how do I publish to the gallery”, “how do I change the language” — and the AI will teach you step by step with screenshots, in any of the four languages.
4. Animation Mode (▶ Animation Mode)
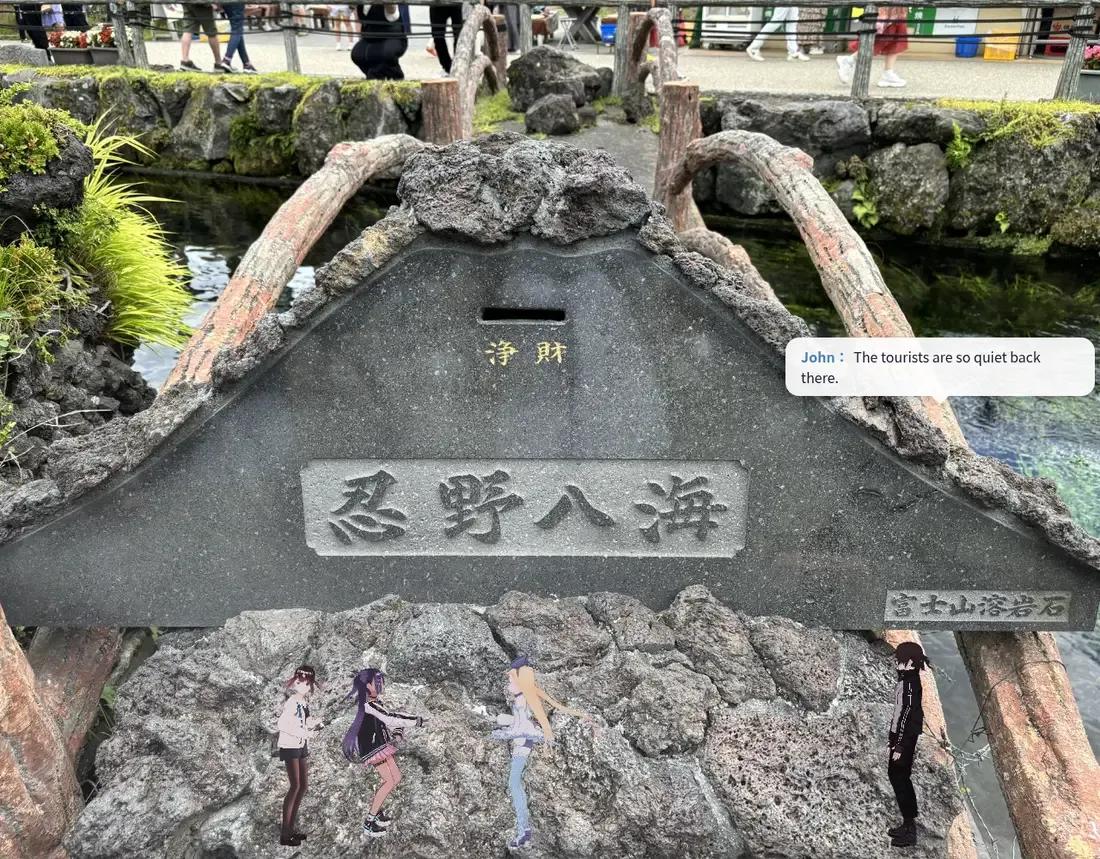
Tap the ▶ Animation Mode button on the right side of an artwork / photo to enter; it also starts automatically after 5 minutes of inactivity. This is a mode for relaxing and enjoying the artwork and stories, so the chat window and settings bar are hidden for a while.
4.1 Switching artworks / album photos
| Action | Phone / tablet (touch) | Computer (keyboard & mouse) |
|---|---|---|
| Switch to the previous / next artwork | Swipe ← → left/right | ← → arrow keys |
| Switch to the previous / next photo in the album | Swipe ↑ ↓ up/down | ↑ ↓ arrow keys |
| Show / hide the toolbar | Single-tap the screen | Single-click the screen |
| Exit Animation Mode | Double-tap the screen | Double-click the screen, or press Esc |
A hint appears at the bottom of the screen: ”← → swipe to change artwork · double-tap to exit”.
4.2 Toolbar buttons (single-tap the screen to bring them up)

| Icon | Function | Notes |
|---|---|---|
| 🔁 | Auto-play | When on, it automatically moves to the next artwork; tap again to turn off (the button dims). |
| 🪄 | Effects toggle | Open the panel to choose particle effects like cherry blossoms, snow, fireflies, and more. |
| 🎨 | Photo filter | Apply filters like vintage photo, black & white, or warm tone to the current view. |
| 🎭 | Anime character on / off | Hide or show the anime character on screen with one tap. |
| ♫ | Mute background music | Mute / unmute. |
| ⏭ | Next track | Change the background music. |
After you open a panel, tapping anywhere outside it closes it automatically. Your preferences (auto-play / character toggle) are remembered and carry over next time. Which anime characters perform (the casting) is set by the “Character choreography” step when you upload the album (see section 5), and can’t be changed after upload.
4.3 Effects / filters (panel details)
🪄 Effects
Opening it reveals a row of effect options (cherry blossoms, snow, rain, fireflies, bubbles, light flares…), and you can pick several:
- Tap once = turn that effect on; tap again = turn it off.
- Nothing selected = no effects.
- Your choices are remembered, so the same set applies every time you enter Animation Mode.
🎨 Photo filter
Only affects album “photos” (it makes no difference to artworks). Pick one filter in the panel (vintage photo, black & white, warm tone, cool tone…) and it applies instantly. This is single-select — to turn it off, tap “None”.
4.4 What happens in Animation Mode
- The artwork slowly zooms and pans with a Ken Burns effect.
- The anime character walks out from the scene, moves around, and speaks lines (a speech bubble pops up on screen).
- The background BGM is chosen automatically to match the artwork’s mood.
- If you can’t hear sound the first time you enter, ”👆 Tap to enable” appears on screen — tap it once to unlock audio.
To change what the character says in the animation: each photo’s character lines are stored in the album’s “Dialogue” field (split by character: Character 1, Character 2…). To edit them → go back to the home screen and open your album → 📝 Edit Story at the bottom → pick that page → edit the three fields “Title / Story / Dialogue” → save, and the next time you enter Animation Mode it’ll speak the new lines.
These lines are originally generated automatically by the AI from the story card + story mood (running in the background); you only need to go in and edit manually when you want to tweak a specific sentence.
4.5 Back to the home screen
Double-tap (or press Esc, or tap ▶ again) to exit Animation Mode and return to the home screen, where you can chat with the AI and upload photos.
5. Uploading photos / building an album
On the home screen, switch to any artwork and a 📁 Upload photos to build an album button appears in the artwork’s top-right corner. Tap it → the system file picker pops up, and you choose one or more photos. Once the upload finishes, the “Album Wizard” opens automatically. The progress bar at the top has 6 steps: Search → Select → Download → Music → Story → Done, and it guides you through them in order.
After you confirm the first stop, the “Select” stop lists the photos you just uploaded — check the ones you want in this album and tap “Confirm download”; the “Download” stop saves the chosen photos into the album. You can upload several at once and add only some of them. Below we explain the three key stops where you’ll need to take action.
Stop 1: Album basics (story card + story mood)
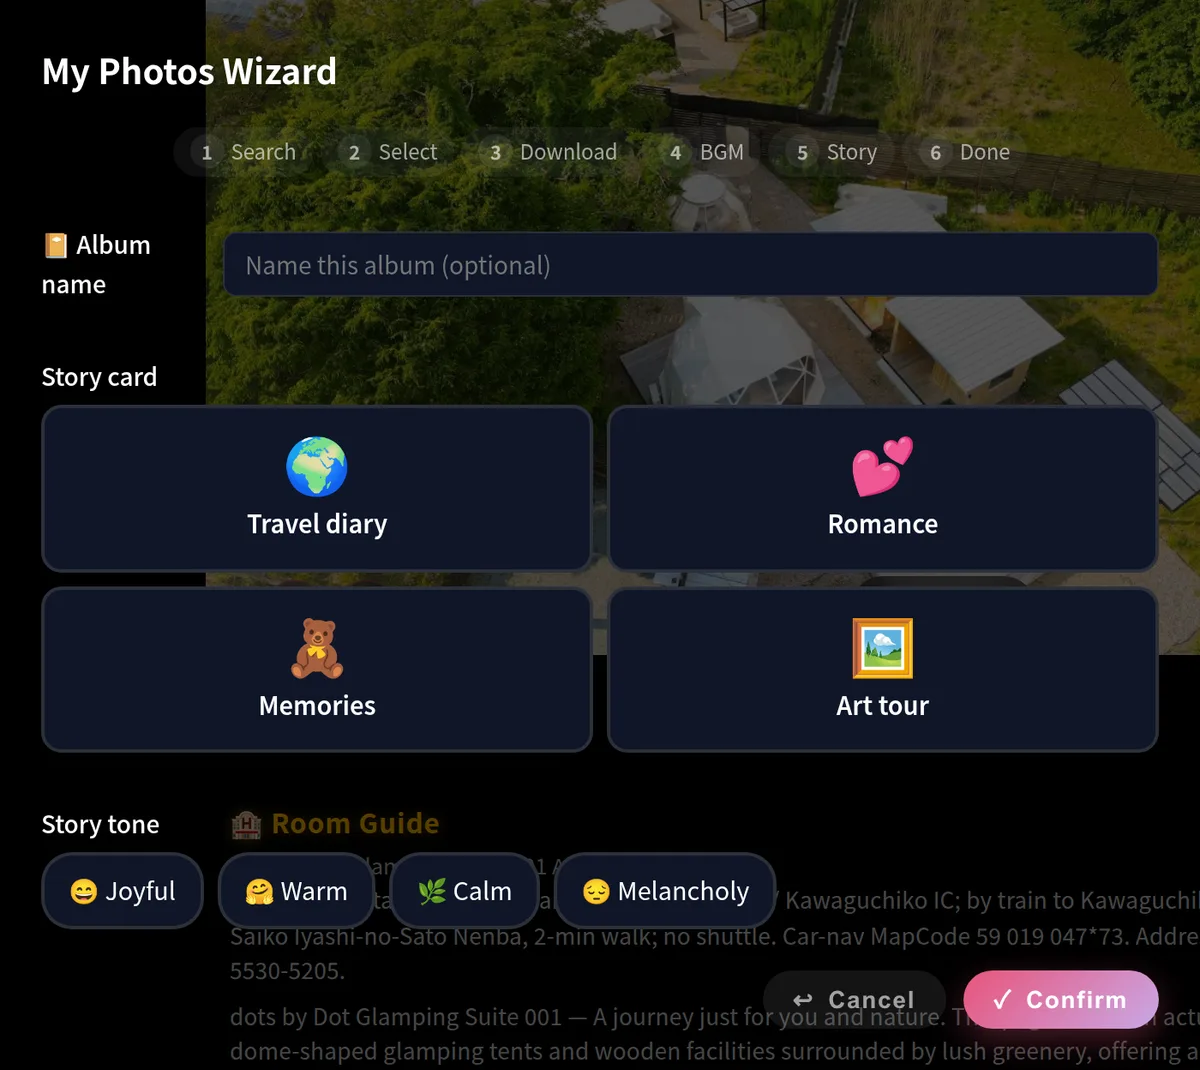
- 📔 Album name (optional) — give this album a name.
- Story card (pick one of four): 🌍 Travel log / 💕 Romance / 🧸 Memories / 🖼️ Art tour.
- Story mood (pick one of four): 😄 Cheerful / 🤗 Warm / 🌿 Calm / 😔 Wistful.
Once chosen, tap ”✓ Confirm”. (The progress bar at the top of the wizard walks you through Search → Select → Download → Music → Story → Done.)
Stop 2: Music
The music selection panel pops up. You can type a song title (adding the artist makes it more accurate) or just tap ”✓ Confirm” to let the system pick music automatically based on the story mood.
Stop 3: Character choreography
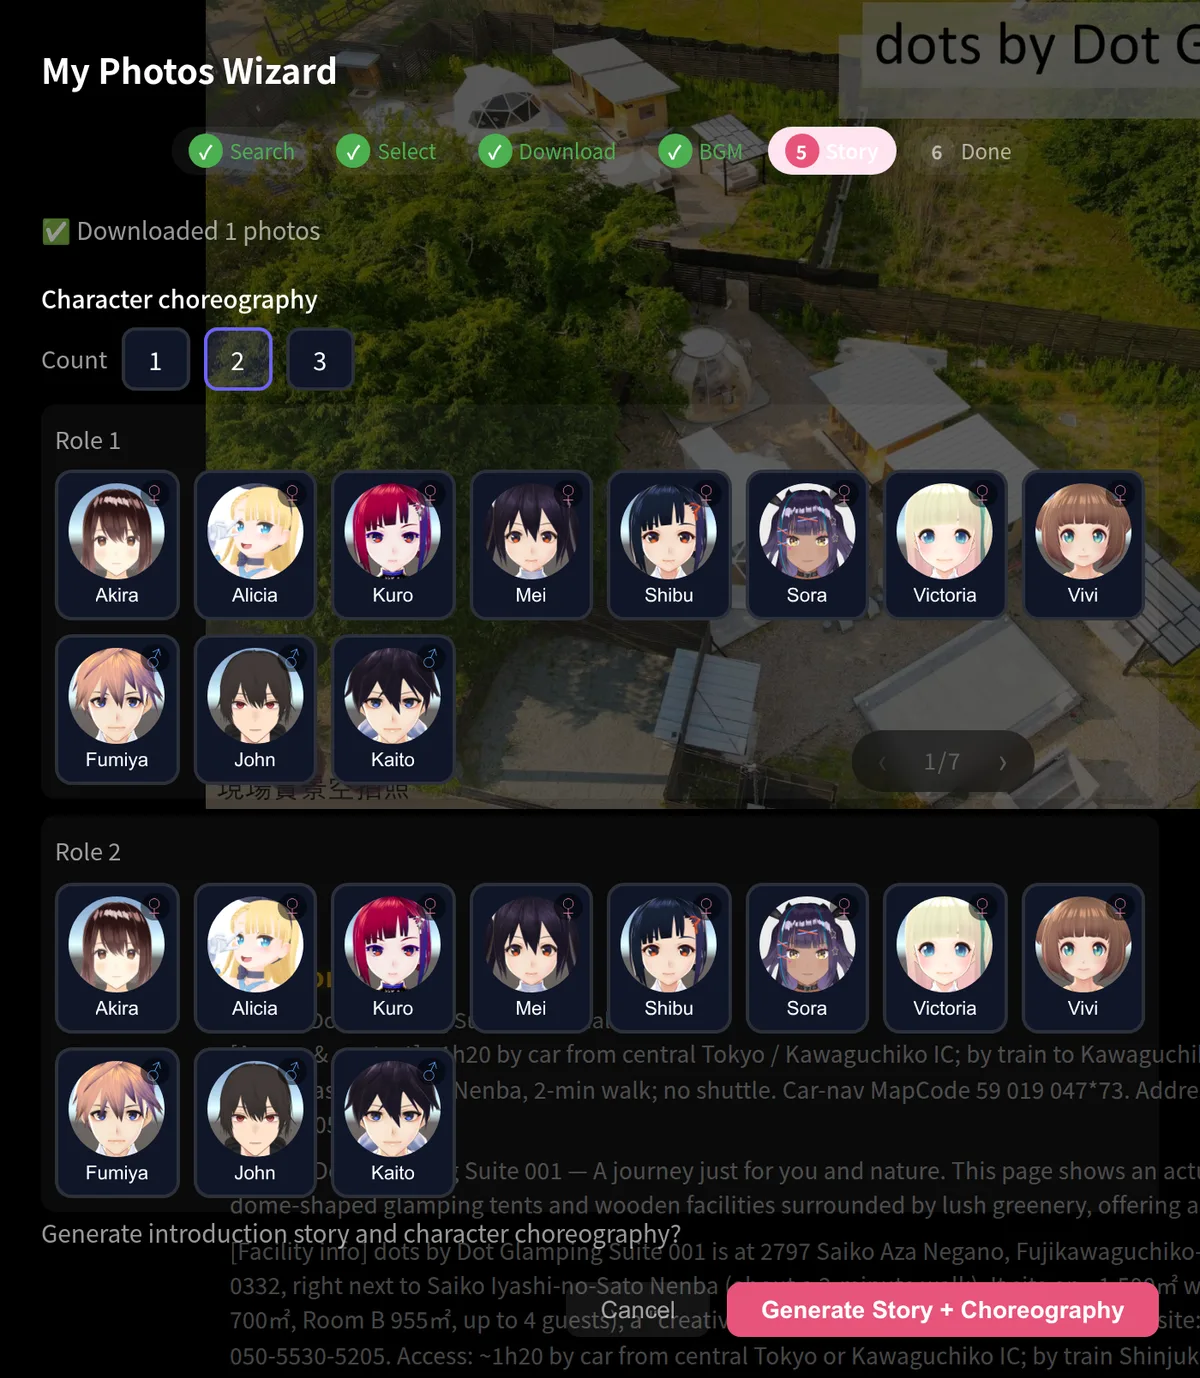
- First choose the number of characters (1 / 2 / 3).
- For each character, a full wall of character thumbnails appears (Akira / Alicia / Kuro / Mei / Shibu / Sora / Victoria / Vivi / Fumiya / John / Kaito …). Tap a thumbnail to cast that one; the ♂ / ♀ mark in the card’s top-right corner shows gender. Each character can only be picked once per performance — anyone already chosen turns gray on the other slots’ thumbnail walls.
- Tap “Generate story + choreography” and the AI will produce an intro story plus the anime characters’ performed movements.
This runs in the background (about 30–60 seconds) — after you tap, you can close the wizard and keep chatting or browsing other albums; you don’t have to wait in front of the screen. It’ll notify you when it’s done (a ”📖 View album” prompt on phones, a “Story generated” button on the right on computers) — tap it to see the result; the story text in the album also updates automatically from “Generating…” to the full content.
Privacy protection: the photos you upload and any music you choose are only visible / audible to you — other guests are never shown them. Everything is cleared after checkout. A reminder: please only upload your own photos, and avoid using copyrighted images.
6. Changing an album’s music
Only albums you uploaded yourself can have their music changed; the hotel’s default artworks / albums are managed by staff.
Steps
- On the home screen, switch the view to your album (where you can see your uploaded photos).
- A 🎵 Album music button appears in the story area at the bottom-right of the artwork — tap it.
- The “Music selection” dialog pops up. In the text box, type a song title (adding the artist makes it more accurate, e.g.
Yiruma River Flows in You). - Tap ✓ Confirm, and the system will search for and fetch the closest matching track.
- Once downloaded, it shows ”🎵 Set: 〈Song title〉”. After you close the dialog, that album will play with the new music from then on.
If you’d rather not change it, tap ↩ Cancel to leave.
Things to note
- The dialog warns “⚠️ This music can’t be played in ‘public areas’” — meaning the downloaded music is only allowed for personal / non-public use. To play it in shared spaces like the lobby or restaurant, keep the hotel’s default music, or check with staff first.
- If the song can’t be found, the system will tell you it failed, the original music stays unchanged, and you can try different keywords.
- Can’t see the 🎵 Album music button = this album isn’t one you uploaded.
7. Back-office settings (guest version)
Tap ⚙️ in the top-left of the home screen to open “Back-office settings”. The guest version’s left menu has only 2 sections: General settings and Character settings (the ”🔒 Admin” entry is staff-only, and guests can’t see it). Editing, deleting, and making videos from albums are all done on the home screen instead (see sections 5 and 8).
7.1 General settings
- Interface language — use the dropdown to switch between Traditional Chinese / Simplified Chinese / Japanese / English; the change takes effect immediately.
- Appearance theme — tap a thumbnail to change the site’s overall visual style (e.g.
magical-girl,dark-cosmos); the theme in use shows an “In use” badge. Your preference is saved on your device and carries over next time.
7.2 Character settings (change the AI character)
Shows a wall of selectable AI character thumbnails: Haru, Hiyori, Mao, Natori. Each card’s name is the character’s name, and the one currently “In use” is marked below its thumbnail.
- Tap a character card → the chat character on the home screen switches to that one right away.
- Changing the character only affects the character standing on the home screen while you chat; the anime characters that walk out and perform in Animation Mode are determined by the “Character choreography” step when you upload the album (see section 5, and it can’t be changed after upload).
- Once switched, the character’s default expressions / movements / voice apply automatically — no extra setup needed.
7.3 Back to the home screen
Tap the ”← Art assistant” logo in the top-left to return to the home screen; or just use your browser’s back button.
8. Generating an album video (🎬)
Turn a whole album (photos + anime character performance + BGM + narration + subtitles) into an mp4 video. The portrait format can be downloaded straight to your phone / computer to keep; the 🖥️ landscape format is used to publish to the Traveler Gallery (see section 9) and won’t be downloaded to your device.
8.1 Doing it from the home screen (recommended, fastest)
- On the home screen, open one of your own albums (the button row at the bottom, left to right, is: 📷 Add photos / 🗑️ Delete photos / 📝 Edit Story / 🔀 Reorder photos / 🎵 Album music / 🎬 Share video).
🔀 Reorder photos: tap it to open the reorder window and use ← / → to change the order of photos in the album; whichever is first becomes the cover.
- Tap 🎬 Share video → a modal pops up: “Which platform is this for?”.
- Pick the format you want (see the 6 options below).
- The video is generated in the background — after you pick a format the modal closes, and you can keep chatting or browsing other albums; you don’t have to wait in front of the screen. The first run takes about 5 minutes to generate the album master file, then a few more seconds to convert it into your chosen format (switching to another format for the same album later takes just a few seconds, since the master file is cached).
- Once generated:
- Pick a portrait / social format (the first 5) → a download button pops up (on phones it’s a full pink bar at the bottom of the screen, “Video ready — tap to download”; on computers it’s a side button on the right) — tap it to save to your device.
- Pick 🖥️ landscape (the last one) → when it’s done it directly opens the “Publish to Traveler Gallery” dialog, where you enter a nickname to publish (landscape is only used for the gallery and won’t be downloaded to your device, see section 9 for details).
- If your screen locks or you leave the page mid-way and miss the download button — no worries, you can download the same video anytime from 📁 My Files → Videos (see section 10).
8.2 The 6 format options
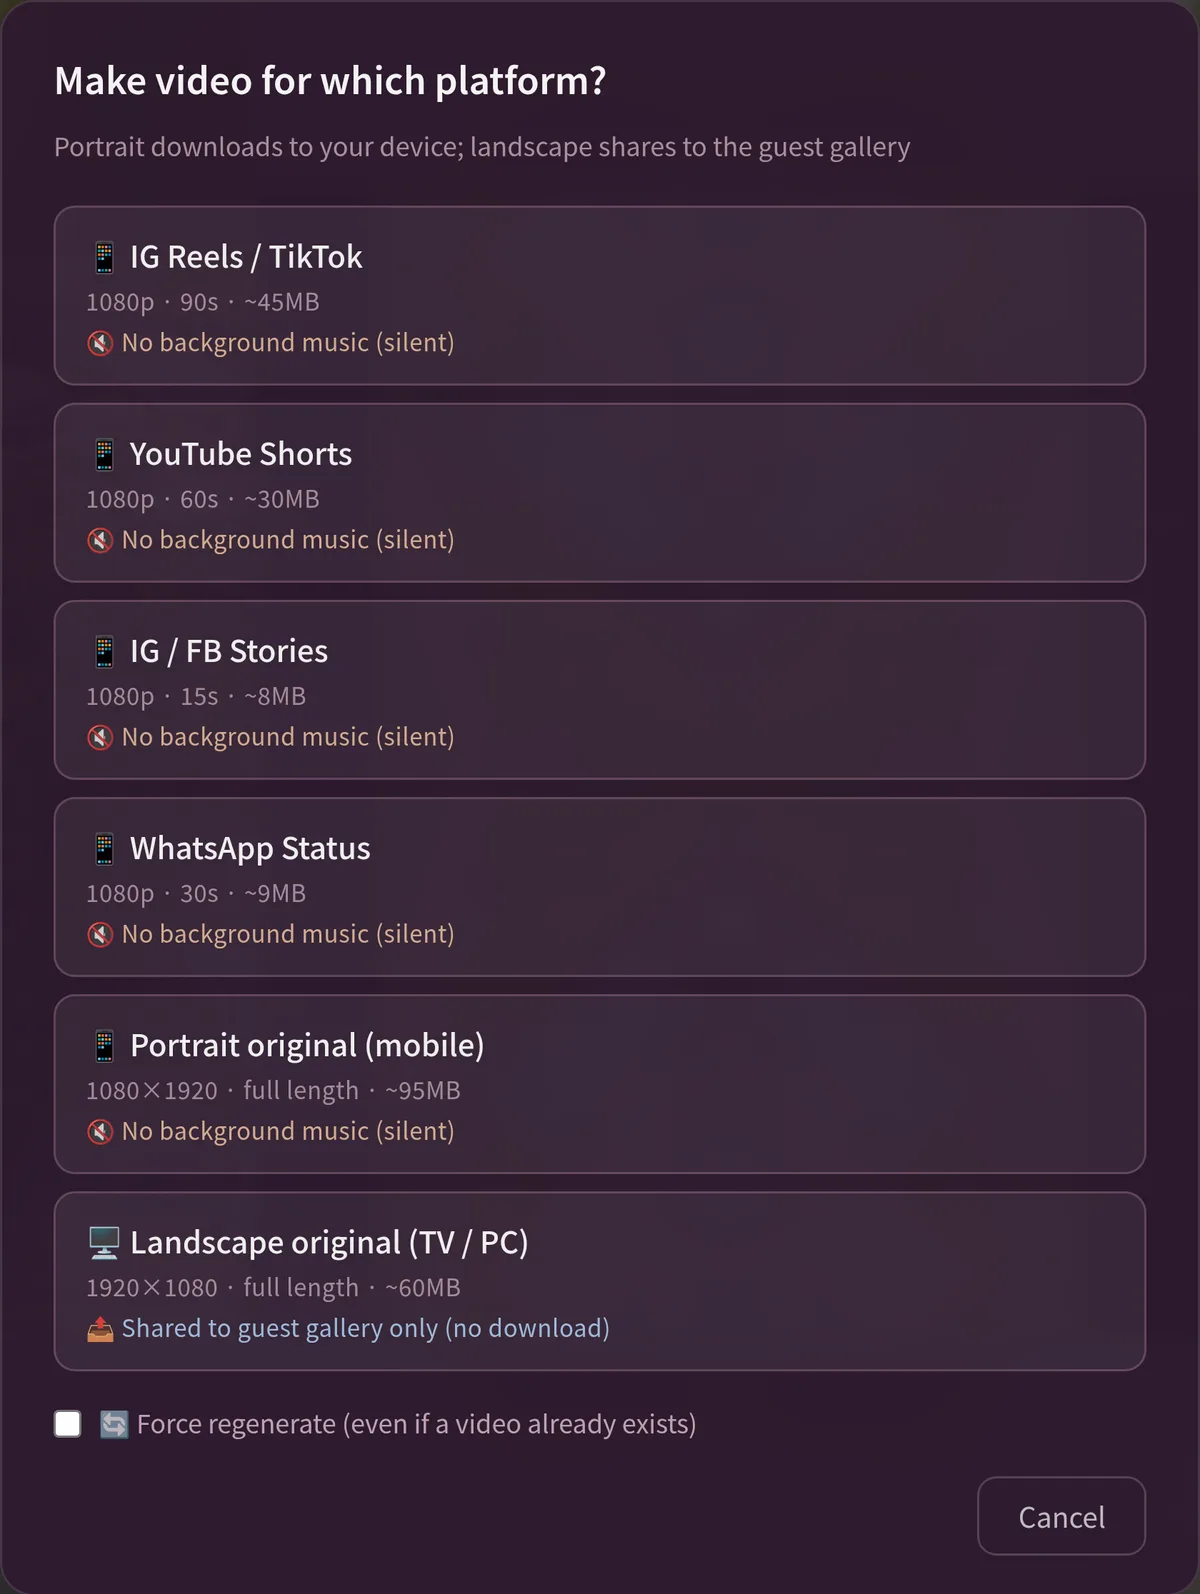
Portrait (the first 5) = watch on a phone held upright, downloadable to your device (4 social specs + the portrait original). Landscape (the last one) = 16:9, and choosing it publishes the album to the Traveler Gallery (not downloaded to your device, see section 9).
The top 4 short social formats are already trimmed automatically to each platform’s supported length (IG Reels 90 seconds, Shorts 60 seconds…), so you don’t need to cut them yourself.
Note
- Videos downloaded to your device don’t include background music (muted): album music may be copyrighted, so downloaded files always have the BGM removed (the modal marks it ”🔇 No background music (muted)”). The story is shown as subtitles, so the downloaded file is silent — you can add your own music inside IG / TikTok and other apps. (Online playback in the gallery does keep the music.)
- Only one video can run at a time; to run the next one, wait for the current one to finish before tapping.
- After the master file has been generated (no matter which format you picked), downloading other formats of the same album is fast (a few seconds).
- 🔄 Force regenerate checkbox: after you’ve changed the album’s photos or story, tick this to run it again, otherwise it’ll pull the previous cache.
- Want to tweak the content? First go into ”📝 Edit Story” to change that page’s title / story / dialogue, then tick “Force regenerate”. (The story card and story mood are set at upload time and can’t be changed afterward.)
8.3 Sharing to social media
The site makes a video file that meets each platform’s specs for you (9:16 portrait, already trimmed to the platform’s supported length), so sharing to social takes just three steps — no need to crop or adjust the ratio yourself:
- In step 8.1, pick the format for the matching platform — to post an IG Reel / TikTok choose ”📱 IG Reels / TikTok”, for stories choose ”📱 IG / FB Stories”, for a WhatsApp status choose ”📱 WhatsApp Status”…
- Download it to your phone (the “Video ready — tap to download” button at the bottom, or 📁 My Files → Videos).
- Open that app (IG / TikTok / YouTube / WhatsApp) → post / new post / story → pick the video you just downloaded from your phone’s camera roll → publish.
Want to send it to family or post it from another device? Use 📁 My Files → 🔗 Share to generate a link that’s valid for 7 days (with a QR code) — the other person scans the code or taps the link to download.
The site will not log into or post to your social accounts directly (to keep your accounts safe) — it only makes the video in the correct spec, and you do the actual posting inside each app.
Want to share publicly and make the leaderboard right within the site? See the next section, “Traveler Gallery”.
9. Publishing to the Traveler Gallery (community gallery)
The “Traveler Gallery” is a public video wall — you can publish an album video you’ve made so others (including non-guest friends and family) can see it, like it, and share it in the gallery. Whether to publish is entirely your choice, and everything is private by default.
The gallery plays 🖥️ landscape (16:9) videos, so you need a landscape video before you can publish. There are two ways:
Method A (recommended, all in one go):
- On the home screen, open one of your own albums → tap 🎬 Share video → choose 🖥️ Landscape original (TV / PC).
- The landscape video generates in the background (about 5 minutes the first time), and when it’s done the “Publish to Traveler Gallery” dialog opens automatically.
Method B (the album already has a landscape video):
- The 🌐 Publish to gallery button in the button row (next to 🎬 Share video) becomes tappable — when there’s no landscape video yet it’s grayed out, with the hint “Please first generate a landscape video with ’🎬 Share video’”.
- Tap 🌐 Publish to gallery.
Both methods open the same dialog, which asks you to fill in:
- Public display name (nickname) — the author name others see in the gallery (e.g.
TravelLover_Mei). Your room number and real name are never shown — only the nickname you enter here. - Tick “I understand and agree to make this video public to everyone.”
Tap Publish. When done, the button changes to ✅ Published, and the share link is copied to your clipboard automatically so you can paste it straight to friends.
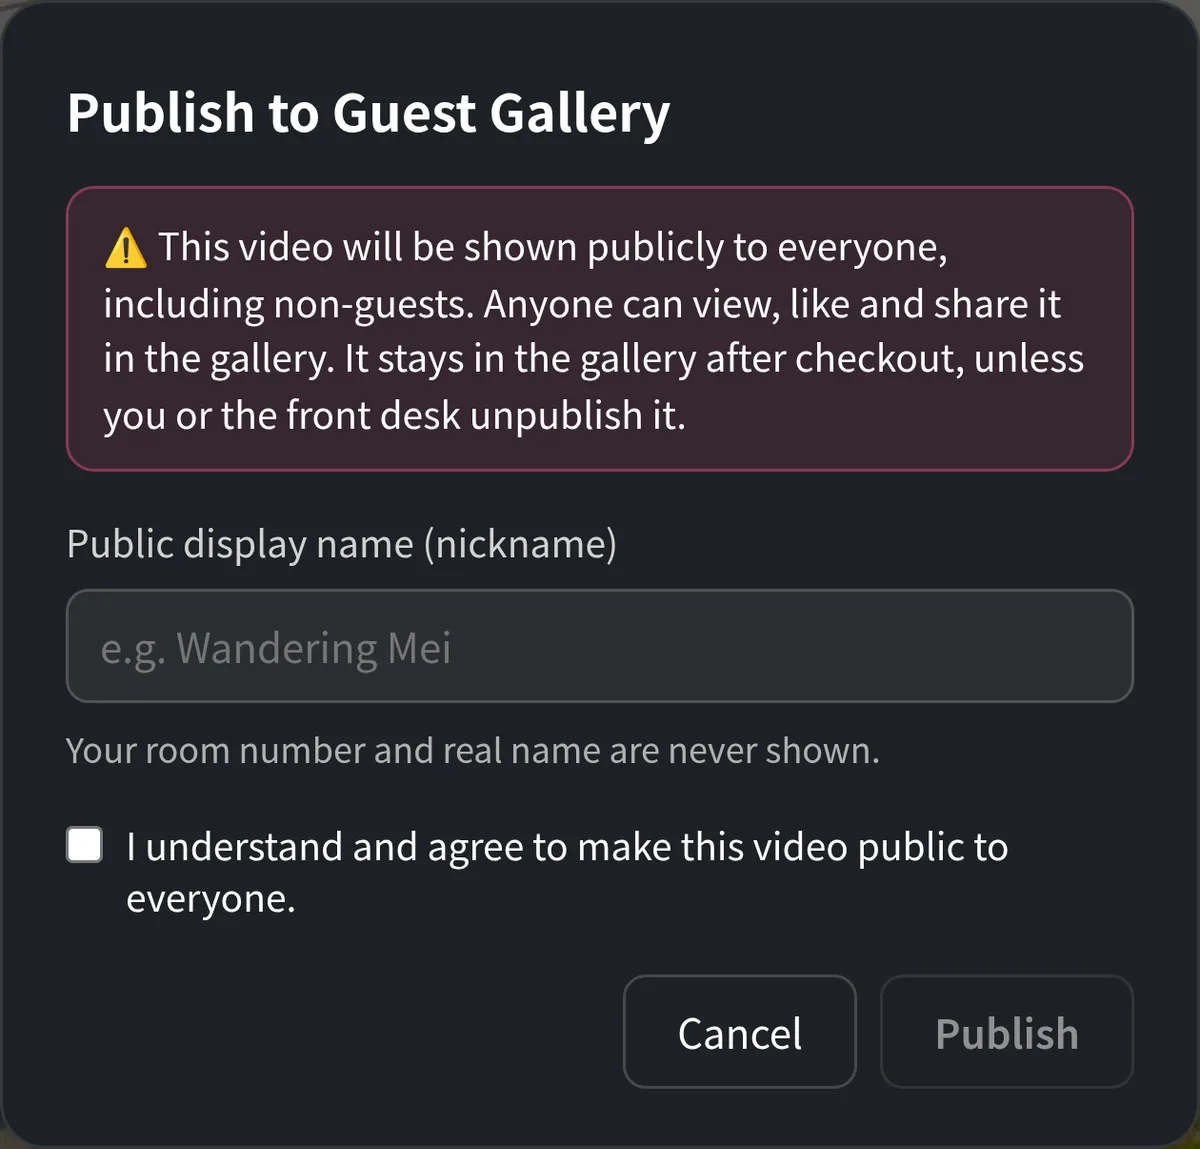
Want to change the nickname or unpublish? Tap the button again to reconfigure / change the status.
9.2 Entering the gallery to see everyone’s work
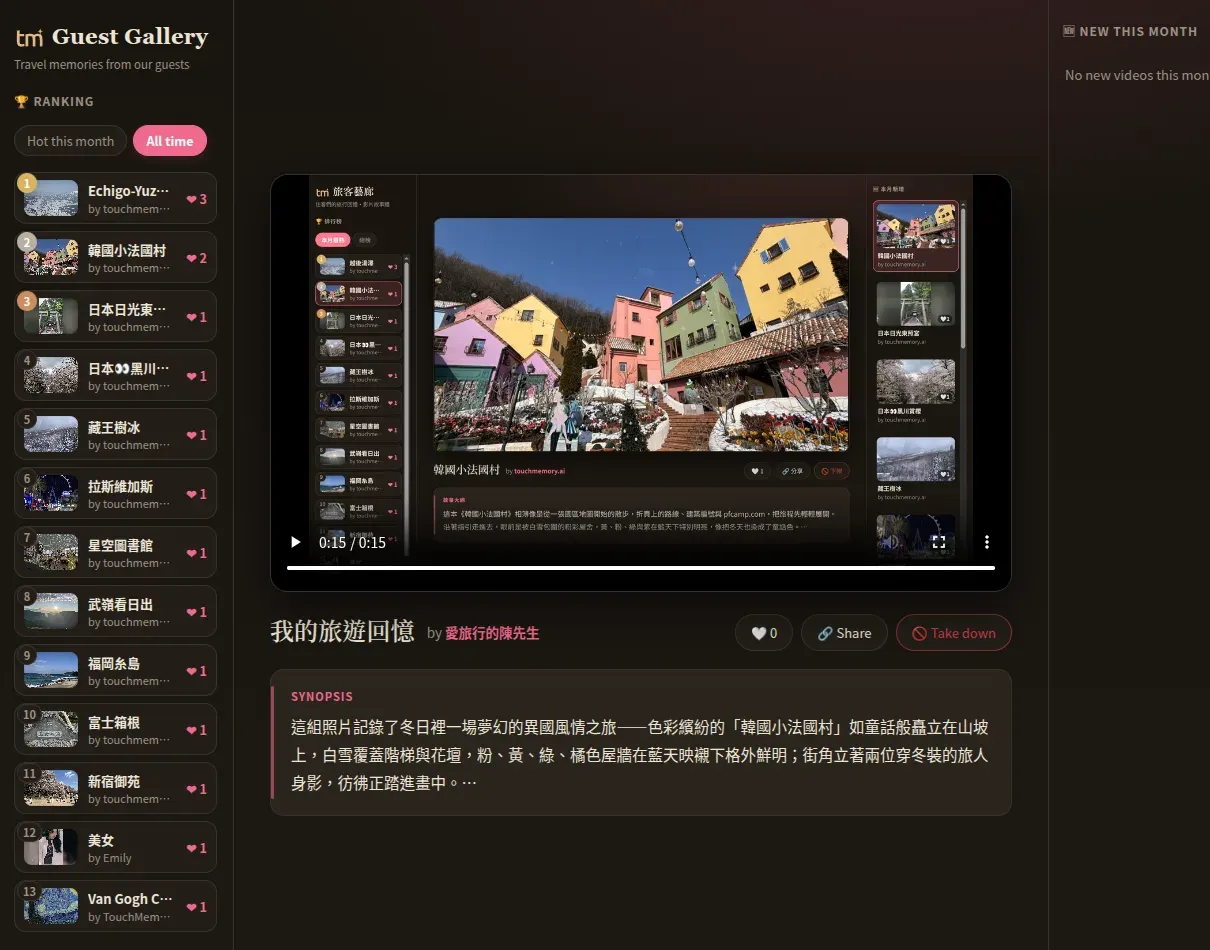
In the tool area at the bottom-right of the home screen there’s a 🖼️ Traveler Gallery button — tap it to open the gallery in a new tab (URL /gallery). The gallery has a three-column layout:
- Left column 🏆 Leaderboard — switch between “Hottest this month / All-time”, ranked by likes, with 🥇🥈🥉 for the top three.
- Center — the 16:9 video player, with the title, author nickname, ❤ like, 🔗 share, and the video’s story summary below it.
- Right column 🆕 New this month — cards of videos newly published this month, scrollable.
9.3 Liking and sharing
- Anyone (including logged-out visitors) can give a video a ❤ like in the gallery — one vote per person, and the like count updates the leaderboard in real time.
- Tapping 🔗 Share copies that video’s public link (on phones it brings up the system share sheet directly), so you can send the link to friends to watch.
9.4 Taken down by the property
If a video is removed from the gallery by a property admin, you’ll see ⛔ Taken down on that album on the home screen, and you won’t be able to publish it again yourself. If you have questions, please ask the front desk.
10. My Files (📁)
Tap 📁 in the top-left of the home screen to open “My Files”, where everything related to you is gathered in one place — you can download individual files or grab everything in one bundle.
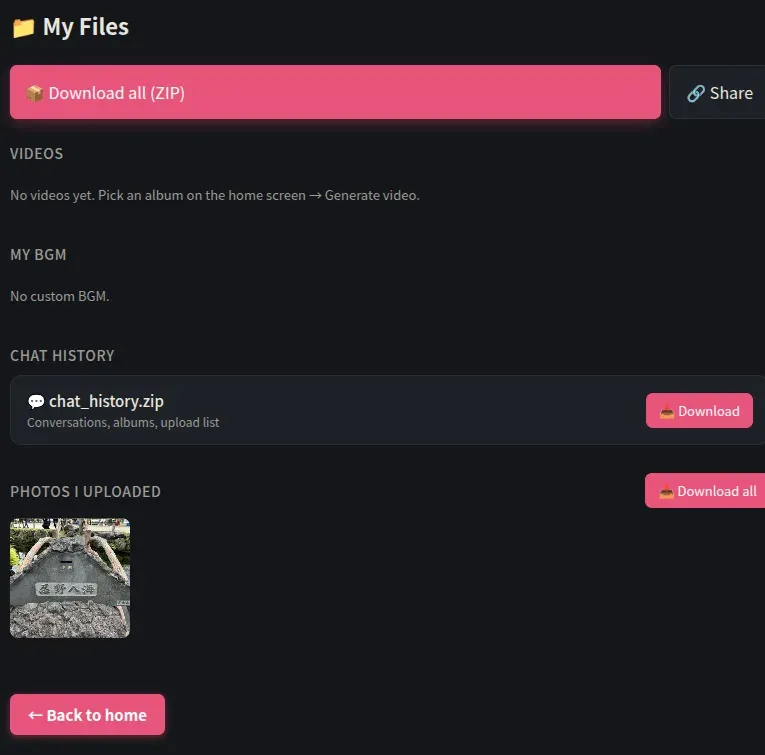
| Section | Contents |
|---|---|
| 📦 Download everything (ZIP) | Bundle everything below into a single zip to take at once. |
| 🔗 Share | Generate a download link that expires after 7 days (with a QR code), handy for sending to family or downloading yourself on another device. |
| Videos | The mp4s made via ”🎬 Share video” in section 8, downloadable individually. |
| My BGM | The music files you chose for your albums. |
| Chat history | An export of your chats with the AI. |
| Photos I uploaded | A thumbnail list — download them one by one, or tap ”📥 Download all” to bundle them into a zip. |
Want a keepsake before checkout? Be sure to download a copy from 📁 My Files first — at checkout the property clears this stay’s chats and photos for you, and you won’t be able to get them back afterward.
11. Checkout / finishing up
- Tap 👋 to log out, or just close the page. Logging out only logs you out — it doesn’t delete data, so if you want a keepsake, be sure to download first.
- To keep a record, go to 📁 My Files and download your videos / photos / chats before logging out.
- At checkout the property clears this stay’s chats and photos for you (to protect your privacy); do your downloading before checkout.
FAQ
-
What can and can’t the AI character answer?
- ✅ What it can help with:
- This accommodation’s facilities and services — Wi-Fi, breakfast, baths / hot spring, parking, check-in/out, house rules, and so on (based on the “accommodation intro” content the property has set up).
- How to use this site — how to upload photos to build an album, generate a video, publish to the gallery, change language / character, and even little hiccups like “no sound, the mic isn’t responding, I can’t log in, the video is queued” — it’ll walk you through those too.
- Nearby sights, restaurants, weather, transport, opening hours — for anything the property hasn’t set up, the AI will look it up online and then answer.
- Chatting with you, talking about the photos and artwork stories you’re looking at, and even rewriting or shortening your album story for you.
- ⚠️ These it’ll ask you to check with the front desk / will politely decline:
- Details about this accommodation that aren’t in its information (prices, bookings, date changes, billing, specific house rules…) — the AI won’t guess; it’ll honestly say it’s not sure and ask you to check with the front desk.
- When real-time info can’t be found — it’ll tell you honestly, and suggest confirming before you set out, or offer to ask the front desk for you.
- Topics unrelated to accommodation / travel (news, the stock market, price comparisons, legal or medical advice, etc.), as well as technical system problems — the AI will politely decline.
- The AI supports Traditional Chinese / Simplified Chinese / Japanese / English, and replies in the language you asked in.
- ✅ What it can help with:
-
No sound? Check the tablet’s volume and whether the browser tab is muted; if it’s still silent, refresh the page.
-
Mic not responding? The first time you use it, an “Allow microphone” prompt appears — please tap allow.
-
Code entered correctly but can’t log in / it says it’s already in use on another device? One check-in code can only be tied to one device. If you switched to another phone or tablet, or cleared your browser data, the second device will be blocked — please first tap 👋 to log out on the original device, or ask the front desk for a fresh check-in code (it won’t affect the albums you’ve already made). If the code has expired, simply ask the front desk for a new one.
-
Need to change the language? Switch it in the top-right of the login page; after logging in you can switch it in the settings bar, and the home screen will follow.
-
The video has been queued for a while and isn’t ready? Try refreshing the 📁 My Files page; it usually takes 1–3 minutes, and if it goes past 5 minutes you may need to tap 🎬 Share video once more.
-
Will publishing to the gallery reveal my room number or name? No. The gallery only shows the public nickname you entered — never your room number or real name — and whether to publish is entirely your choice (private by default).
-
Can’t find the ”🌐 Publish to gallery” button, or it’s grayed out? The gallery plays landscape (16:9) videos, so first generate a landscape original with 🎬 Share video, and the button will light up so you can tap it.
-
Can’t find the Traveler Gallery entrance at all? The Traveler Gallery is an optional feature — if your property hasn’t enabled it, the related buttons won’t appear. You can confirm with the front desk.